
Fill Out a Valid Pre Trip Inspection Checklist Form
Before hitting the road, ensuring that a vehicle is safe and operational is crucial, especially for commercial drivers. The Pre Trip Inspection Checklist form serves as a vital tool in this process, guiding drivers through a comprehensive examination of their vehicle. This checklist typically includes sections for inspecting the engine, brakes, lights, tires, and other essential components. By systematically reviewing these areas, drivers can identify potential issues before they lead to breakdowns or accidents. Additionally, the form often emphasizes the importance of checking fluid levels, ensuring that mirrors are properly adjusted, and confirming that safety equipment is in place. This proactive approach not only enhances safety but also helps in compliance with regulatory requirements. Ultimately, completing the Pre Trip Inspection Checklist can contribute to smoother operations and greater peace of mind for drivers and fleet managers alike.
Common mistakes
-
Skipping Sections: Many individuals overlook certain sections of the checklist, thinking they are not relevant. Each part of the form is designed to ensure safety and compliance, so it’s crucial to complete every section thoroughly.
-
Inaccurate Information: Providing incorrect details, such as vehicle identification numbers or tire pressure readings, can lead to serious consequences. Always double-check the information before submitting the form.
-
Failure to Sign and Date: Some people forget to sign and date the checklist. This step is essential for accountability and serves as proof that the inspection was completed.
-
Neglecting to Report Issues: If any problems are identified during the inspection, failing to report them is a common mistake. Documenting issues ensures they are addressed promptly, maintaining safety on the road.
Preview - Pre Trip Inspection Checklist Form
Class A CDL
 ®
®
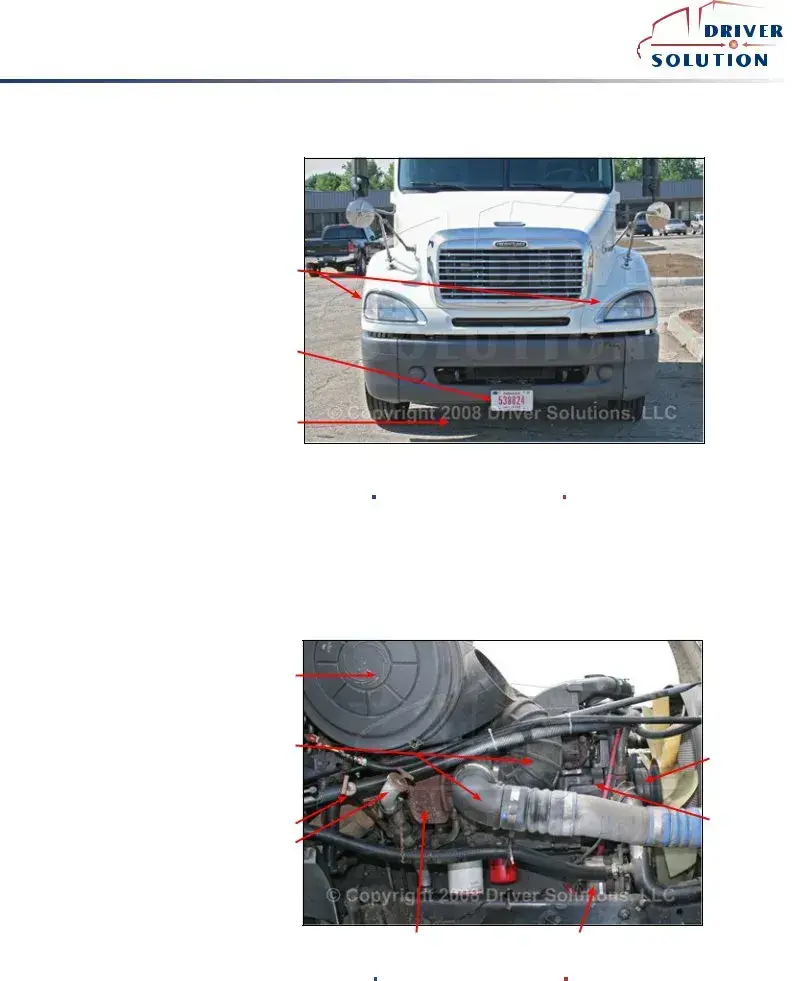
FRONT OF TRACTOR
LIGHTS & REFLECTORS o Proper Color
o Working
o Not Broken o Not cracked
LEAKS
o Check for puddles
o Check for drips under engine
Lights
License Plate
Leaks
Reference Items |
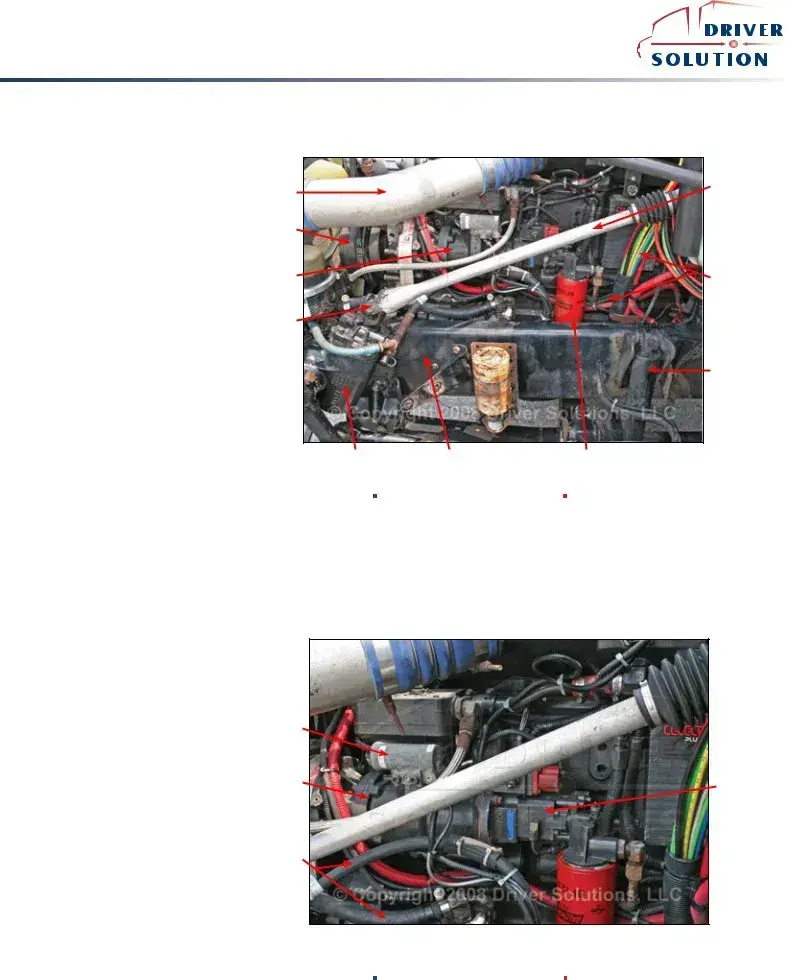
ENGINE COMPARTMENT - PASSENGER SIDE
WATER PUMP o Mounted Securely
o No missing bolts or parts o Hoses attached securely
o No leaking hoses or water pump o Belts no more than ¾ inch of play
o Belts not cracked, frayed, or damaged
ALTERNATOR
o Mounted Securely
o No missing bolts or parts
oWires good connections, not frayed
oBelt no more than ¾ inch of play
oBelts not frayed or cracked
OIL LEVEL
oCheck for level and condition
PLUS ALL OTHER HOSES & WIRING
oNot cracked, frayed, or broken
oBelts no more than ¾ inch of play o Hoses not leaking
Engine Air Duct Work
Engine Air Duct Work
Oil Dip Stick
Oil Fill
|
Accessory Drive |
|
Belts |
|
Water Pump |
Turbo Charger |
Alternator |
Reference Items |
1
Class A CDL
 ®
®
ENGINE COMPARTMENT - DRIVER SIDE
COOLANT
oCheck for level and condition
oHoses attached and not leaking
POWER STEERING RESERVOIR
oMounted properly
oHoses attached and not leaking
oCheck for level and condition
AIR COMPRESSOR
oMounted Securely
oNo missing bolts or parts
oNo air leaks at lines
oCheck if gear or belt driven
oBelt no more than ¾ inch of play
oBelts not cracked or frayed
STEERING GEAR BOX
oMounted properly
oNo missing parts, nuts or bolts o Lines and hoses not leaking or broken
|
Engine Coolant |
|
Reservoir |
|
Windsheild |
|
Washer Fluid |
|
Reservoir |
Engine Air Duct |
|
Work |
|
Power Steering |
|
Reservoir |
Radiator Brace |
|
|
Steering Gear |
|
Box |
|
Pitman Arm |
|
Reference Items |
POWER STEERING RESERVOIR |
ENGINE COMPARTMENT - DRIVER SIDE CON’T |
||
|
|
|
|
o Mounted properly |
|
|
|
o Hoses attached and not leaking |
|
|
|
o Check for level and condition |
|
|
|
AIR COMPRESSOR |
|
|
|
o Mounted Securely |
Power Steering |
|
|
o No missing bolts or parts |
|
|
|
Reservoir |
|
|
|
o No air leaks at lines |
|
|
|
o Check if gear or belt driven |
|
|
|
o Belt no more than ¾ inch of play |
|
|
|
o Belts not cracked or frayed |
|
|
|
STEERING GEAR BOX |
Steering Gear |
|
|
Box |
|
|
|
o Mounted properly |
|
|
|
o No missing parts, nuts or bolts |
|
|
|
o Lines and hoses not leaking or |
Pitman Arm |
|
|
broken |
|
|
|
|
|
|
|
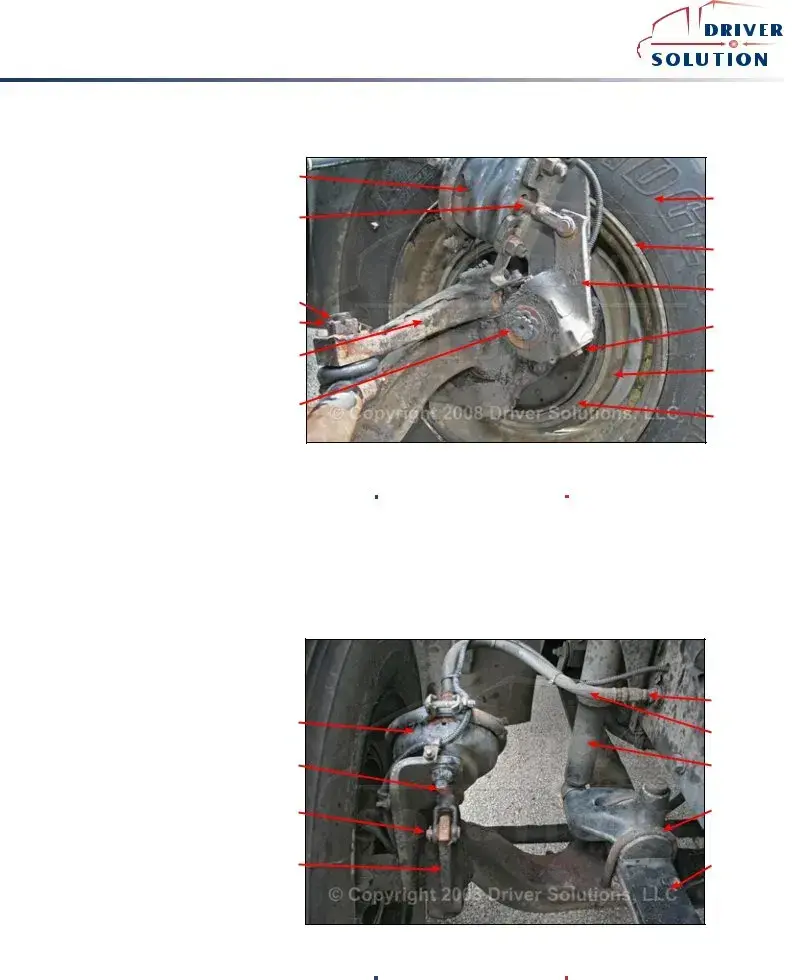
STEERING LINKAGE |
|
|
|
o Pitman arm, Drag link, Steering |
|
|
|
knuckle, Tie rods and tie rod ends |
|
|
|
o Not cracked, bent or broken |
Spring Mount |
Drag Link |
Leaf Spring |
o Castle nuts and cotter pins |
|
|
|
o Not missing and in place |
|
|
|
Reference Items |
Air Governor
Air Compressor
Engine Oil Pan
2
Class A CDL
 ®
®
AIR COMPRESSOR o Mounted Securely
o No missing bolts or parts o No air leaks at lines
o Check if gear or belt driven
o Belt no more than ¾ inch of play o Belts not cracked or frayed
STEERING GEAR BOX
o Mounted properly
oNo missing parts, nuts or bolts o Lines and hoses not leaking or broken
ENGINE COMPARTMENT - DRIVER SIDE CON’T
Engine Air Duct
Work
Fan Belts
Gear Driven Air
Compressor
Steering
Steering Column
Additional Hoses & Wiring
Shock Absorber
Steering Gear Box |
Frame Rail |
Fuel Filter |
Reference Items |
||
ENGINE COMPARTMENT - AIR COMPRESSOR
AIR COMPRESSOR o Mounted Securely
o No missing bolts or parts o No air leaks at lines
o Check if gear or belt driven
o Belt no more than ¾ inch of play o Belts not cracked or frayed
Air Governor
Gear Driven Air Compressor
Hoses
Fuel Pump
Reference Items |
3
Class A CDL
 ®
®
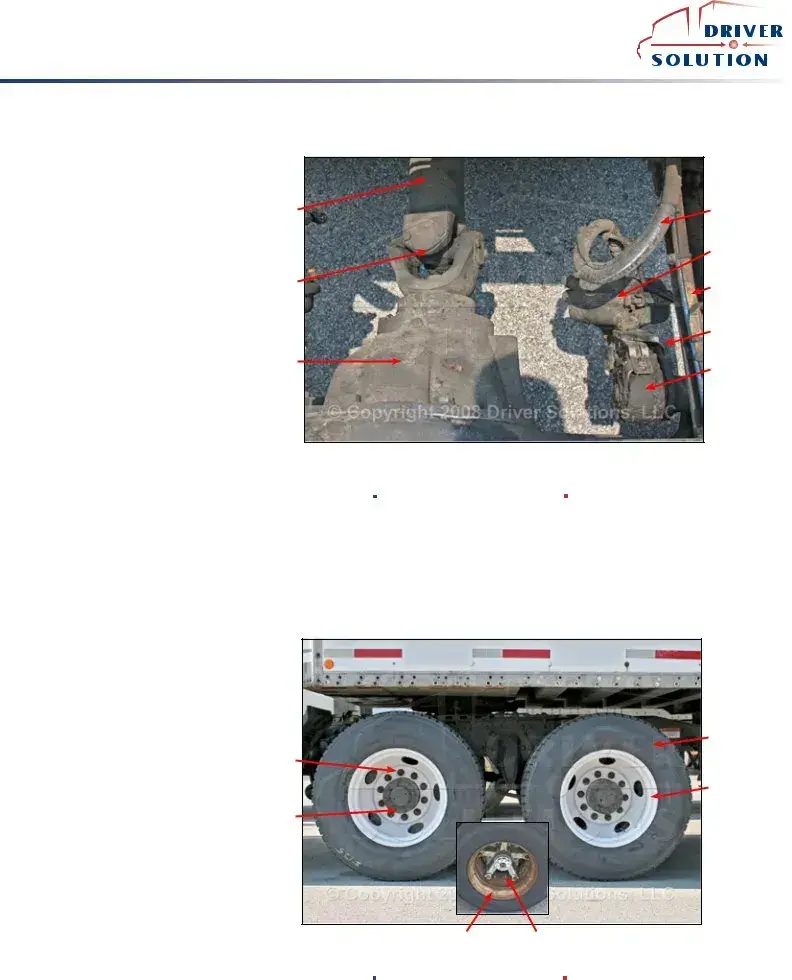
FRONT SUSPENSION
LEAF SPRINGS
o Not shifted or out of place
oNot cracked, broken or missing
SPRING MOUNTS
oMounted securely- front, back, and
oNot cracked or broken
SHOCK ABSORBER
oMounted Securely
oNot bent or dented o Not leaking
Shock Absorber
Leaf Spring
Tie Rod
Air Hose
Air LIne
Tie Rod End
Axle |
Service Brake |
Chamber |
Reference Items |
LEAF SPRINGS
o Not shifted or out of place
oNot cracked, broken or missing
SPRING MOUNTS
oMounted securely- front, back, and
oNot cracked or broken
SHOCK ABSORBER
oMounted Securely
oNot bent or dented o Not leaking
FRONT SUSPENSION CON’T
Frame Rail
Leaf Spring
Air Dryer location varies depending on model.
Located either behind the front bumper or behind the fuel tank.
Reference Items |
4
Spring Mount
Air Dryer
Class A CDL
 ®
®
HOSES AND LINES |
|
FRONT BRAKES |
|
|
|
||
o Mounted securely |
Service Brake |
|
|
o |
Not leaking |
|
|
o |
Not cracked or frayed |
Chamber |
|
|
Tire |
||
|
|
|
|
CHAMBER |
Push Rod |
|
|
o Mounted securely |
|
|
|
o Not dented or damaged |
|
Wheel |
|
o |
Not leaking |
|
|
SLACK ADJUSTER |
|
Slack Adjuster |
|
o |
No more than 1 inch of free play at |
Castle Nut |
|
the push rod with the brakes released. |
Cotter Pin |
Adjustment Nut |
|
o |
Not bent, broken, loose, or missing |
|
|
|
|
||
parts |
Steering |
|
|
|
|
Knuckle |
Brake Drum |
DRUMS |
|
||
|
|
||
o |
Not cracked, broken or dented |
|
|
o |
No oil leaking from inner oil seal, |
Snap Ring |
|
free of debris |
|
Brake Lining |
|
LININGS |
|
|
|
oNo cracked, broken or missing parts o Not less than ¼ inch in thickness
Reference Items |
HOSES AND LINES o Mounted securely o Not leaking
o Not cracked or frayed
CHAMBER
o Mounted securely
oNot dented or damaged
oNot leaking
SLACK ADJUSTER
oNo more than 1 inch of free play at the push rod with the brakes released.
oNot bent, broken, loose, or missing parts
DRUMS
oNot cracked, broken or dented
oNo oil leaking from inner oil seal, free of debris
LININGS
oNo cracked, broken or missing parts
oNot less than ¼ inch in thickness
FRONT BRAKES CON’T
Service Brake
Chamber
Push Rod
Clevis Pin &
Cotter Pin
Slack Adjuster
Reference Items |
Air Line
Air Hose
Shock Absorber
Spring
5
Class A CDL
 ®
®
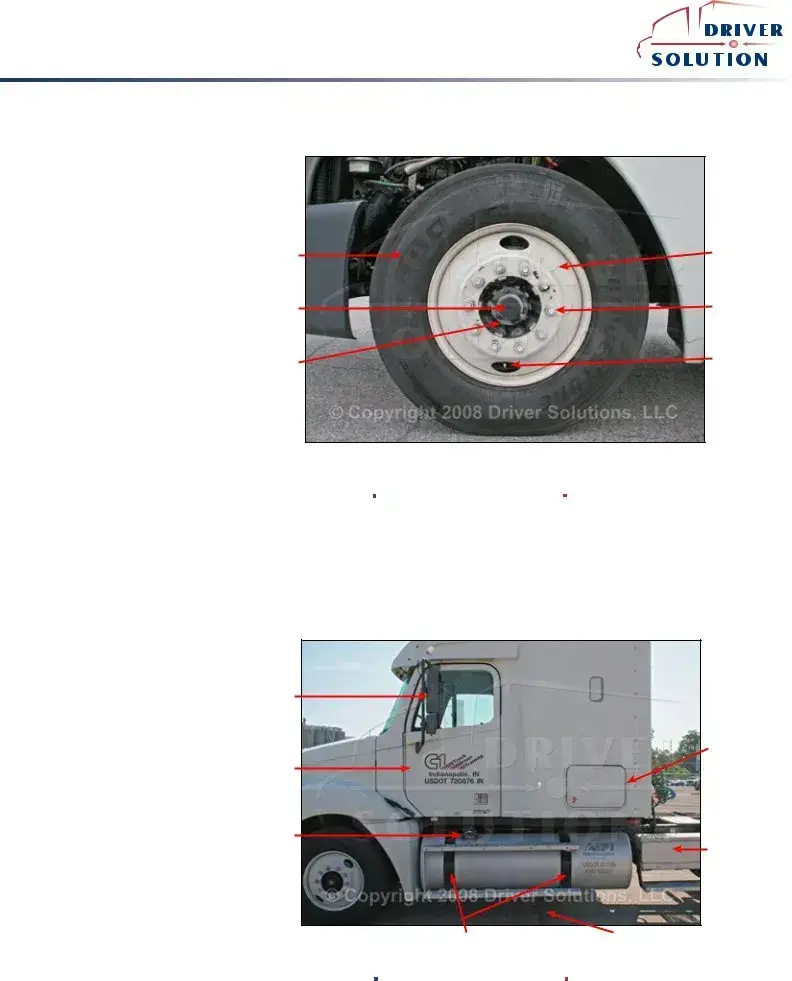
FRONT WHEEL
TIRES
oProper inflation – company or manufacturer specification
o No bulges, cuts, or retreads
o Minimum tread depth of 4/32”
RIMS
oNot bent, cracked, No welding repairs.
LUG NUTS
oNone are missing
oTight – no shinny threads, or rust trails
OUTER HUB OIL SEALS
oNot leaking, no missing bolts o Proper oil level
Tire |
Wheel |
|
Hub Oil |
Lug Nut |
|
Reservior |
||
|
||
Outer Hub |
Valve Cap |
|
Oil Seal |
|
Reference Items |
DRIVER FUEL AREA
DRIVER’S DOOR
oDoor opens and closes properly
oSeal is in good condition
DRIVER’S MIRRORS
oClean and free of obstruction
oNot cracked, broken, or damaged
oMounted securely
FUEL TANK
oMounted securely
o Not leaking
o Seal in cap OK
Mirror |
Storage |
Compartment |
Door |
Cap & Seal |
Battery Box & |
Cover |
Saddle Mounts |
Leaks |
Reference Items |
6
Class A CDL
 ®
®
AIR LINES & ELECTRIC LINE o Not cracked, frayed, cut, or kinked o Mounted securely at the glad hands o Not leaking
BEHIND THE CAB
BATTERY BOX & BATTERIES o Box is mounted properly
o Batteries are secure in the box o Lid secure
o Connections not corroded
CATWALK
o Mounted properly
oNot, missing, or damaged
oFree of obstructions
DRIVE SHAFT
oNot bent, or damaged
oCoupling,
EXHAUST SYSTEM
oSecurely mounted
oNot dented or damaged
oNot leaking
FRAME
oNot cracked, or damaged
oNo missing bolts
oNo illegal welds
LIGHTS & REFLECTORS
oClean and working
Lights & |
|
Reflectors |
|
Electrical Line |
Exhaust |
Glad Hand |
|
Service & |
|
Emergency |
|
Airlines |
Drive Shaft |
|
|
Battery Box & |
|
Batteries |
|
Frame |
Catwalk |
Reference Items |
FRONT OF TRAILER
HEADER BOARD
oNo holes or missing rivets
LIGHTS & REFLECTORS
oNone broken, cracked, or missing
oWorking and proper color of amber
Lights |
Header Board |
Height Sticker
Electric Hookup
Air Line
Reference Items |
7
Class A CDL
 ®
®
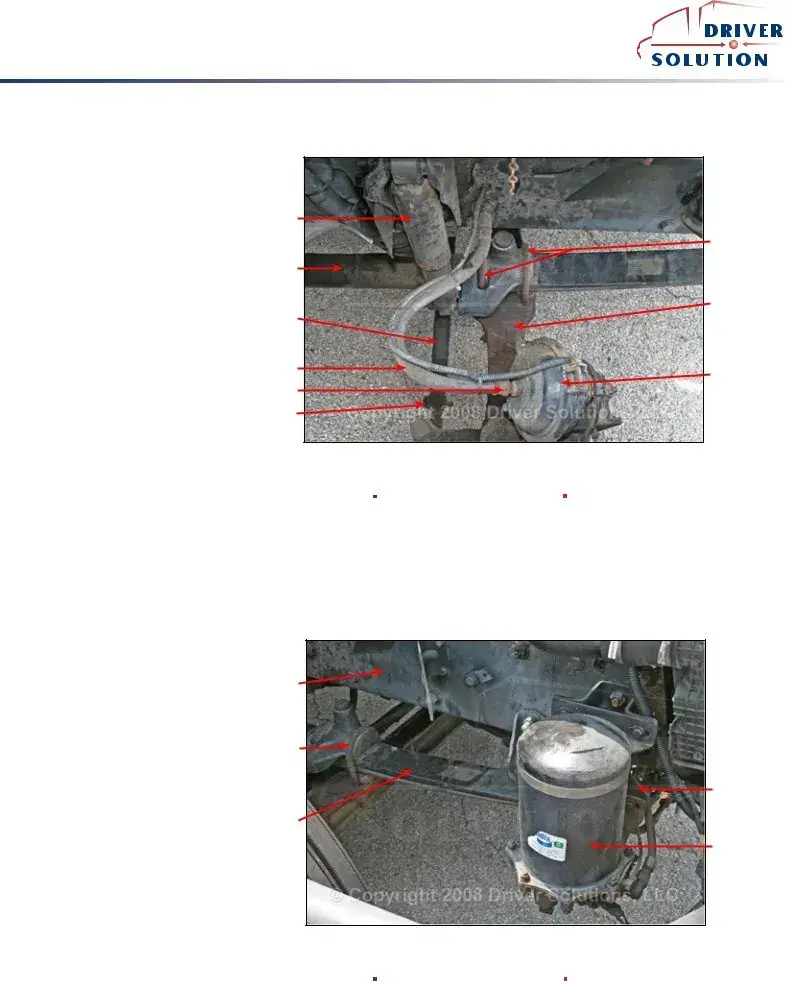
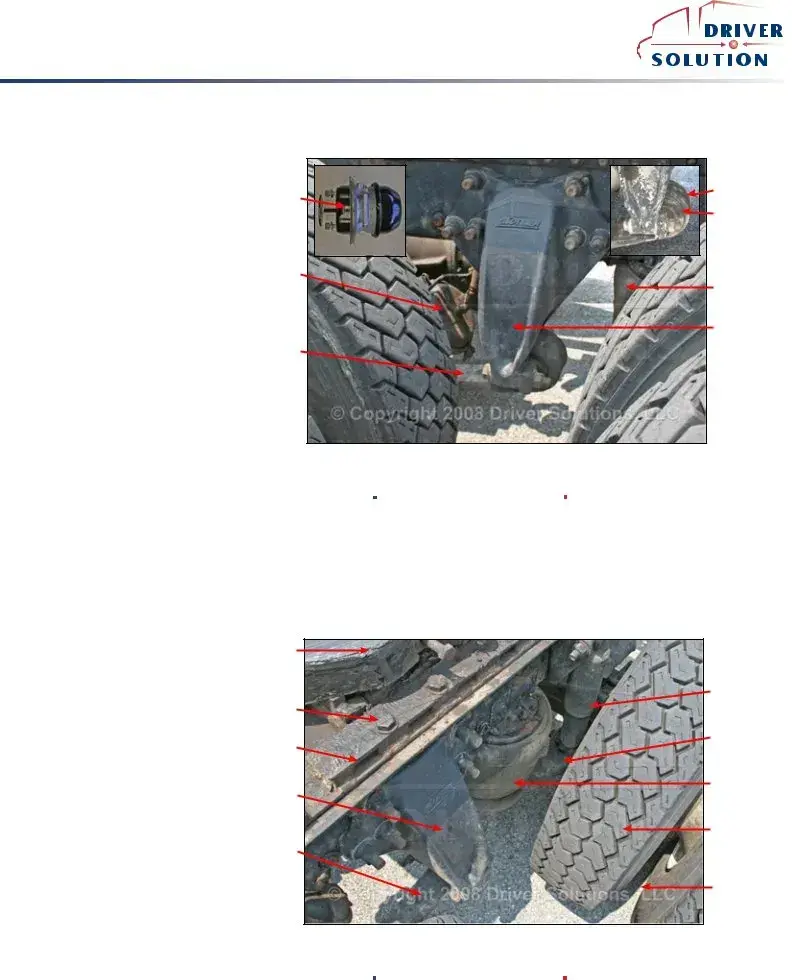
DRIVE AXLE SUSPENSION
CONTROL ARM MOUNT o Mounted securely
o Not bent, broken or damaged
CONTROLARM
oMounted securely – front, back, and
o Not cracked, or broken
SHOCK ABSORBER
o Mounted Securely
oNot bent, dented or leaking
TORSION BAR
oMounted Securely
oNot bent, broken or damaged
AIR BAGS
oMounted Securely
o Not leaking
Spring Brake |
Torsion Bar |
|
|
Chamber |
Control Arm |
|
|
Spring Brake |
|
Chamber |
Air Bag |
|
|
|
Control Arm |
|
Mount |
Control Arm |
|
Reference Items |
DRIVE AXLE SUSPENSION CON’T & FIFTH WHEEL
CONTROL ARM MOUNT o Mounted securely
o Not bent, broken or damaged
CONTROLARM
oMounted securely – front, back, and
o Not cracked, or broken
SHOCK ABSORBER
o Mounted Securely
oNot bent, dented or leaking
TORSION BAR
oMounted Securely
oNot bent, broken or damaged
AIR BAGS
oMounted Securely
o Not leaking
Skid Plate |
|
|
Shock Absorber |
Mounting |
|
Bolts |
|
Locking |
Spring |
|
|
Pins |
|
Control Arm |
Air Bag |
|
|
Mount |
|
|
Tire |
Control Arm |
|
|
Space |
Reference Items |
8
Class A CDL
 ®
®
HOSES AND LINES o Mounted securely o Not leaking
o Not cracked or frayed
CHAMBER
o Mounted securely
oNot dented or damaged
oNot leaking
SLACK ADJUSTER
oNo more than 1 inch of free play at the push rod with the brakes released.
oNo bent, broken, loose, or missing parts
DRUMS
oNot cracked, broken or dented
oNo oil leaking from inner oil seal, free of debris
LININGS
oNo cracked, broken or missing parts
oNot less than ¼ inch in thickness
DRIVE BRAKES & DRIVE SHAFT
Drive Shaft
Universal Joint
Differential
Reference Items |
Air Line
Service Brake Chamber
Frame
Brake Chamber Mount
Slack Adjuster
TIRES
oProper inflation - company or manufacturer specification.
o No bulges or cuts, can have retreads o Minimum tread depth of 2/32”
RIMS
oNot bent or cracked
oNo welding repairs
LUG NUTS
oNone missing
oTight – no shinny threads, or rust trails
OUTER AXLE SEAL
oNot leaking, no missing bolts
SPACE OR SPACER
oCheck for objects between wheels
oCheck for proper spacing
Lug Nuts
Outer Axle Seal
DRIVE WHEELS
Tire
Bud Rim
Dayton Rim |
Spacer |
Reference Items |
9
Class A CDL
 ®
®
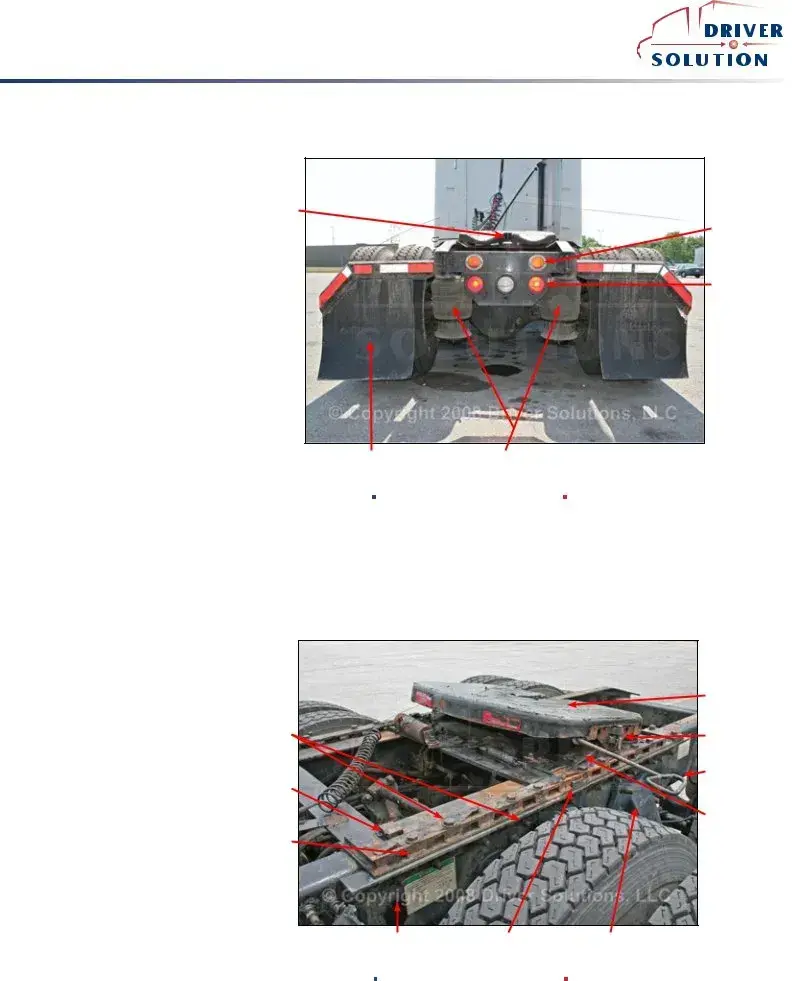
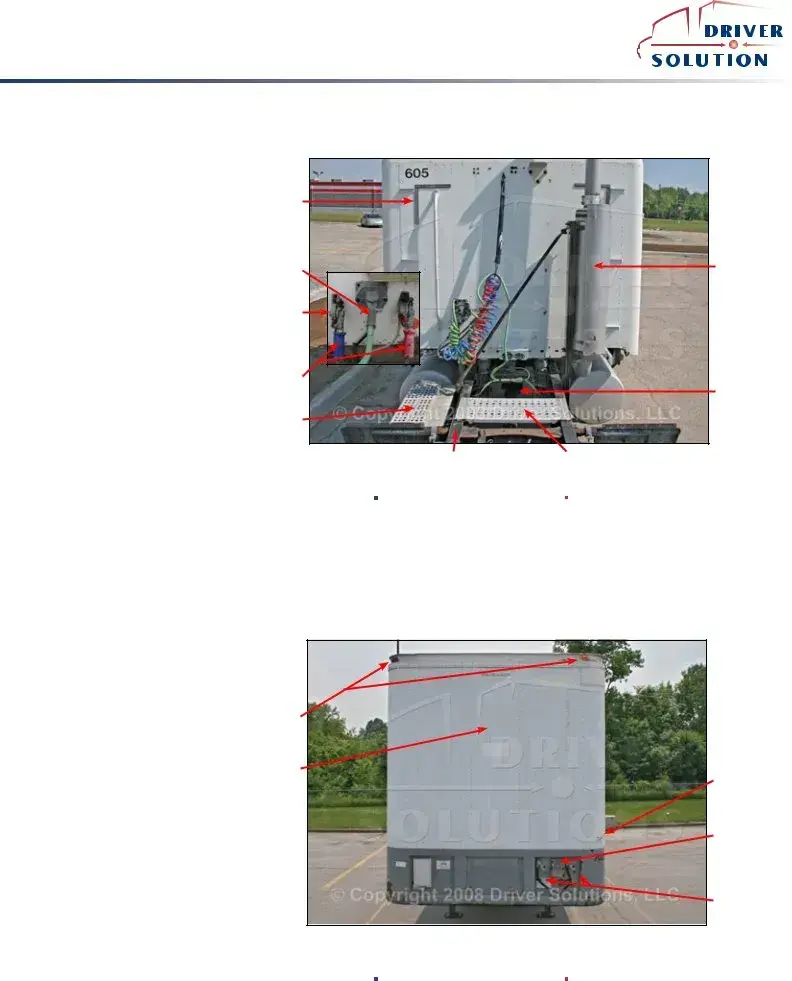
REAR OF TRACTOR
LIGHTS & REFLECTORS o Not cracked, or broken
o Working and proper color
SPLASH GUARDS
oNot missing or torn and properly mounted
Locking Jaws |
|
|
Reflectors |
|
Lights |
Splash Guard |
Air Bags |
Reference Items |
MOUNTING BOLTS
oNone missing or broken
RELEASE ARM
oNot bent, broken, or damaged
oEngaged in the lock position
LOCKING PINS
oNo missing or broken parts
oEngaged and locked
PLATFORM
oSecurely holds skid plate
oNot cracked, or broken
SKID PLATE
oMounted properly on the platform
oProperly greased
oTilting freely
Mounting Bolts
Slide Stops (all 4 corners)
COUPLING SYSTEM
Skid Plate |
Pivot Pin |
Release Arm |
Platform |
KING PIN |
Welds |
oNot broken, bent, or damaged
APRON
oNo bends or damage to visible portions
GAP
oCheck that the trailer apron is lying flat on the fifth wheel skid plate
Frame |
Slide Locking Pin |
Spring Mount |
JAWS |
Reference Items |
|
|
|
|
o Check that the locking jaws are fully |
|
|
closed around the shank of the king pin |
10 |
|
Other PDF Templates
Adp Ipay - Employees can use their pay stubs for securing loans or mortgages as proof of income.
When engaging in the sale or purchase of a mobile home, it is essential to utilize the proper documentation to protect both parties involved in the transaction. The Missouri Mobile Home Bill of Sale serves this purpose by providing a clear record of the transfer of ownership. For additional details on how to properly complete this transaction, refer to the Mobile Home Bill of Sale, which outlines the necessary steps and requirements to ensure a seamless process.
Patient Demographic Form PDF - Capture the zip code to complete the patient's address details.
Documents used along the form
The Pre Trip Inspection Checklist form is a vital tool for ensuring the safety and readiness of vehicles before they hit the road. Alongside this checklist, several other forms and documents are commonly used to maintain compliance and enhance safety protocols. Below is a list of these essential documents.
- Vehicle Maintenance Log: This document records all maintenance activities performed on the vehicle, including oil changes, tire rotations, and repairs. It helps track the vehicle's overall condition and ensures timely servicing.
- Driver's Daily Log: This log captures a driver's hours of service, including driving time, rest breaks, and off-duty hours. It is crucial for compliance with federal regulations regarding driving limits.
- Accident Report Form: In the event of an accident, this form is used to document details such as the time, location, and circumstances of the incident. It aids in insurance claims and legal matters.
- Fuel Purchase Receipt: This receipt provides proof of fuel purchases made during trips. It is important for tracking fuel expenses and can be used for reimbursement purposes.
- Inspection Report: After a vehicle inspection, this report summarizes findings and any necessary repairs. It helps ensure that vehicles meet safety standards and regulatory requirements.
- Route Plan: This document outlines the planned route for a trip, including stops and estimated travel times. It assists in logistics and helps drivers stay on schedule.
- Non-disclosure Agreement (NDA): A critical document for protecting sensitive information, ensuring that shared data remains confidential and secure. For more details, you can visit https://georgiapdf.com.
- Emergency Contact List: This list contains contact information for key personnel, emergency services, and roadside assistance. It ensures that drivers have access to help when needed.
Using these documents in conjunction with the Pre Trip Inspection Checklist fosters a comprehensive approach to vehicle safety and compliance. Together, they help ensure that drivers are prepared and that vehicles are roadworthy, contributing to safer travel for everyone.
Similar forms
The Vehicle Inspection Report serves a similar purpose to the Pre Trip Inspection Checklist. Both documents are designed to ensure that vehicles are in safe operating condition before they are used. The Vehicle Inspection Report typically includes a comprehensive list of components that need to be checked, such as brakes, lights, and tires. Like the Pre Trip Inspection Checklist, it emphasizes the importance of identifying any potential issues that could lead to safety hazards during operation. Regular completion of this report helps maintain vehicle safety standards and compliance with regulatory requirements.
The North Carolina Motor Vehicle Bill of Sale form is a crucial document in the vehicle transfer process that ensures proper registration and titling within the state. It captures essential details such as the make, model, year, and VIN of the vehicle, as well as the sale price and date of transaction. For more information on this important form, visit autobillofsaleform.com/north-carolina-motor-vehicle-bill-of-sale-form/.
The Daily Vehicle Inspection Log is another document that parallels the Pre Trip Inspection Checklist. This log is used by drivers to record their observations and findings regarding the vehicle’s condition each day. Similar to the Pre Trip Inspection Checklist, it focuses on key areas such as fluid levels, tire pressure, and functionality of safety equipment. The Daily Vehicle Inspection Log provides a systematic approach to monitoring vehicle health, ensuring that any problems are documented and addressed promptly, thereby enhancing overall safety and reliability.
The Maintenance Work Order is also comparable to the Pre Trip Inspection Checklist, albeit with a different focus. This document outlines the necessary repairs or maintenance tasks identified during inspections. While the Pre Trip Inspection Checklist is proactive, aimed at preventing issues before they arise, the Maintenance Work Order is reactive, detailing actions taken to rectify problems. Both documents play a critical role in vehicle upkeep, ensuring that any issues discovered during inspections are formally addressed and tracked for future reference.
The Safety Inspection Checklist shares similarities with the Pre Trip Inspection Checklist in that both are utilized to evaluate safety measures. The Safety Inspection Checklist may cover a broader range of safety protocols, including equipment and workplace conditions, but the fundamental goal remains the same: to identify and mitigate risks. By systematically reviewing safety features and compliance with regulations, both documents contribute to a culture of safety and accountability within transportation operations.
Lastly, the Driver's Daily Log is akin to the Pre Trip Inspection Checklist in that it serves as a record-keeping tool for drivers. While the Pre Trip Inspection Checklist focuses on vehicle condition before operation, the Driver's Daily Log tracks hours of service, rest breaks, and driving conditions throughout the day. Both documents are essential for ensuring compliance with transportation regulations and promoting safe driving practices. Together, they provide a comprehensive overview of a driver’s responsibilities and the vehicle’s readiness for operation.
Dos and Don'ts
When filling out the Pre Trip Inspection Checklist form, attention to detail is crucial. Below are five important dos and don’ts to keep in mind.
- Do review the entire checklist thoroughly before starting your inspection.
- Do ensure that all sections are completed accurately and legibly.
- Do use a pen or pencil that is easy to read; avoid using colors that may fade.
- Don't rush through the inspection; take your time to ensure nothing is overlooked.
- Don't leave any section blank; if something doesn’t apply, indicate that clearly.
By following these guidelines, you can help ensure that the Pre Trip Inspection Checklist is filled out correctly and efficiently.
Key takeaways
Filling out the Pre Trip Inspection Checklist form is crucial for ensuring safety and compliance. Here are five key takeaways to keep in mind:
- Thoroughness is essential. Every item on the checklist must be inspected carefully. Skipping steps can lead to serious safety issues.
- Document everything. Accurate records help in maintaining accountability. If an issue arises, having a detailed checklist can protect you legally.
- Timing matters. Complete the inspection before each trip. This proactive approach can prevent breakdowns and accidents.
- Be aware of your responsibilities. As the driver, you are responsible for the vehicle’s condition. Take this duty seriously.
- Report any issues immediately. If you find a problem during the inspection, address it right away. Delaying repairs can lead to bigger problems down the road.
Utilizing the Pre Trip Inspection Checklist effectively can enhance safety for everyone on the road.
How to Use Pre Trip Inspection Checklist
Completing the Pre Trip Inspection Checklist is essential for ensuring that a vehicle is safe and ready for operation. Following these steps will help you fill out the form accurately and efficiently.
- Begin by gathering all necessary materials, including the Pre Trip Inspection Checklist form and a pen or pencil.
- Write the date at the top of the form to indicate when the inspection is taking place.
- Identify the vehicle by entering its make, model, and identification number.
- Check each section of the checklist thoroughly. This includes areas such as brakes, lights, tires, and fluid levels.
- For each item inspected, mark it as “satisfactory” or “unsatisfactory” based on your findings.
- If any issues are found, provide a brief description in the comments section next to the relevant item.
- After completing the checklist, sign and date the form at the bottom to certify that the inspection has been conducted.
- Submit the completed form to the appropriate authority or keep it for your records as required.